Wednesday, April 29, 2009

FL Studio: How to Export A Song

When you’re close to finishing one of your creations in FL Studio, your going to realize that you need to figure out a way to export your song, to a certain format. This is how you do it.
First, make sure you are in song mode. Verify that the orange light next to the play list is on “song.” Use the picture for help.

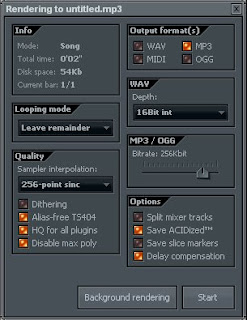


Next, go to File>Export>MP3 File. This will bring up the save box. Find a place for your exported song to be stored and click save. The next thing to pop up is the export window with a bunch of confusing options. I will explain what they all mean.


In the info box you have what mode your in (should say song), total time that your song is, the disk space it takes up, and the amount of bars in the song. Basically, you are going to want to leave everything the way it is, except for the output format, quality and the bitrate. The output format depends on however you would like your song. If you want the song for your Ipod, then leave it in MP3 format. If you want the song in a format that saves all your notes, select MIDI. Next the quality should be set at 256- point sinc, and your bitrate should match it. These numbers show the quality the mp3 will be exported. 256 is basically CD quality, so that would be a good choice. Finally, press start and wait for your song to finish exporting.

FL Studio: Recording Through A Microphone

If you want to take your music to the next level, you’re going to have to start recording your own vocal tracks. This is an essential part of making your songs unique and memorable. The first thing you are going to need is a microphone of some sort. You can use the one built into your laptop or computer if it has one, a cheap 5 dollar microphone from radio shack, or a high quality microphone from your local music shop. It’s up to you.
After you have your microphone hooked up to your computer, you will need to click to microphone button located under the playlist.

Most Likely it will tell you that your driver does not support audio recording, and that you need ASIO drivers. Don’t worry because all you have to do is download them from this site: http://www.asio4all.com/
Once you have your drivers installed you will have to change your audio settings accordingly. To do this go to Options>Audio Settings. You will now need to click the down arrow on the input/output section and change your sound driver to ASIO4ALL V2. Now your settings will allow you to record audio through a microphone. All that is left to do is click the same microphone button from the beginning and it will begin to record your voice.

VST: Trilogy


If you’re looking to add quality bass to your songs I would definitely recommend using Spectrasonic's Trilogy Bass module. The library has 3 different types of bass: Acoustic Bass, Electric Bass, and Synth Bass. The Acoustic Bass has mostly guitar and upright bass sounds. It can be used for any type of music. Electric Bass is mostly used for hip hop and R&B type songs, and Synth Bass is generally used for dance or techno type music. The VST package comes with 5 CD Rom disks that include 3 GB of sounds and samples. The interface is pretty simple looking. It is the same as Spectrasonics other VST, Atmosphere. They probably could have tried to change the design a little bit. It runs of very minimal CPU usage. It uses about 5% which is barley noticeable. I have tested the bass on high quality subwoofers and it sounds phenomenal. This VST is a must if you are trying to create hip-hop style music. It is a bit on the expensive side, costing about 300 dollars. If you have the money to spare I would definitely recommend buying this great VST.

FL Studio: How to Import A VST

I have reviewed a few different VST's and I realized that I never explained exactly how to use them in FL Studio. There really is not much to it, but it could be confusing to those who are trying to do it for the first time.

First, if you’re new to FL Studio, you will probably want to download some free-ware VST’s to get you started before you start purchasing them. A good site to go to is http://www.vstplanet.com/. They have hundreds of VST’s free of charge.Some of the VST’s that you download will install everything for you and you will only have to browse them in FL Studio. But for those that don’t, you will need to do something first.

Save the file wherever is convenient for you, but be sure to remember where you saved it because you will need to access the folder after it completes. When your download has completed, you will need to located the dll. File in the VST folder. It looks like this:


Copy that file and paste it into C:\Program Files\VstPlugins. If that folder sounds unfamiliar to you, don’t worry, it was automatically created when you installed FL Studio. Once you have pasted it in that folder go back to FL Studio. Next, click Channel< Add One < More. This will bring up a list of all your VST's. It will look like this:


Now, click refresh and it should say one new plug-in has been found. Scroll down to that plug-in which is highlighted in red and check it off. Now you are all set to use your new VST.

Monday, April 27, 2009

VST: REFX Claw


REFX’s Claw is VST that is used more for leads rather than basses. It has only 1 oscillator which doesn’t give much room for a good sounding bass. It has a very small interface with about 10 knobs that include: delay, cutoff, wave, drive and a few others. The small interface is good due to the face that it never gets in the way while sequencing. As for the colors, and design, well, its pretty boring to say the least. Despite its small size, lack of oscillators and knobs, it gives off a pretty decent sound. Another downside of this VST is the minimal amount of presets that are given. There is about 20 different presets that contain average sounds. Its CPU usage high for a 1 oscillator synth, which is not good for users who are using more powerful VST’s simultaneously. It uses about 3-4% CPU and has yet to ever crash my system. I would personally recommend this VST to everyone mainly because of the fact that it is free. It is definitely one of the best free-ware VST’s that I have used.

FL Studio: How to Add More Thump to Your Kick Drums


Have you ever used a sampled kick drum that has the sound you’re looking for, but not enough thump? Well I have the perfect solution for you that is extremely simple to do.

The first thing you have to do is open up your desired kick into a new audio channel. Next, go into your channel settings and turn the trim knob at the bottom all the way to the right. This will get rid of any unused sound frequencies that were left in the clip when it was sampled.




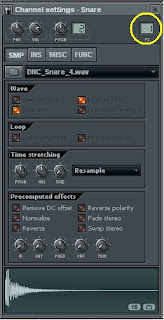
Now we will add an effect to the kick. Open up the mixer by pressing F9. Now you must add the effect called, “Fruity Parametric EQ 2,” into the first insert on your mixer. Now link your kick drum channel to the effect by changing the effect number in the top right hand corner of your channel settings to 1. Now that your channel is linked to the parametric EQ effect, we can begin shaping the kick. First, move the ball with the number 2 inside it up to about 140hz. This will add some bass to your kick. Next move the ball with the number 1 inside it up to 148hz. This will add the low end bass that most sampled kicks lack. You should now notice that your kick has a much louder thump to it.


FL Studio: How To Sample

In this tutorial I will show how to go about sampling. Sampling basically means using a piece of another song in your song. There are many unique ways go about doing it, weather it be chopping up the sample itself, or using it how it is.

First, you must find a song that you would like to sample, and then figure out what part of the songyou would like to use. The song I chose was, “Stairway to Heaven,” by Led Zeppelin. I chose to sample the introduction, or basically the guitar riffs before the vocals come in.

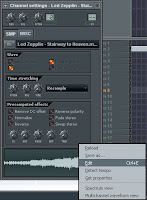
Now that you have your song and part chosen, you must load it into an audio clip. Click on your audio clip in the step sequencer to bring up the channel that will show the sound waves. Right click the sound waves and then click edit.


This will bring up the Edison Audio Editor. From here you must highlight the part you want to sample. Next press Ctr+C to copy it, then click tools > Save Audio Clip to Browser.


Now that your sampled clip is saved, you must now open the FPC. To do this go to Channels > Add One > FPC.


Now go to the browser that opened and drag your audio clip to one of the pads. Now each time you click the pad, your audio clip will play. Now you can begin sampling into your song.


Here is my finished song sampling Stairway to Heaven with an acapella of Eminem - Cleanin' Out My Closet

Sunday, April 26, 2009

How to Create a Mash-Up

A mash-up is a when you mix an acapella with and instrumental beat. This is very simple to do if done right.

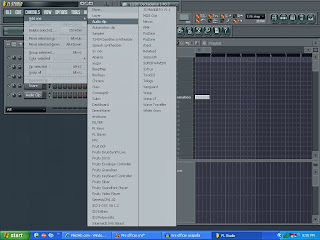
First open up FL Studio and add two audio clips. This can be done by going to Channels> Add > Audio Clip. Next, add your instrumental track, and the acapella. I will be using Wiz Khalifa’s song, Say Yeah, and Alice DeeJay’s song, Better Off Alone.

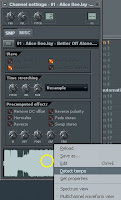
Now, you must get the tempo of the acapella to match the tempo of the instrumental. This can be done easily. First open up your audio channel where the acapella is located, click the SMP tab, right click the sound waves at the bottom and click detect tempo. Use the picture to follow.


It will ask you to select a tempo range that you assume the song will be in so it. Most songs will be between 75 and 150 BMP, or beats per minute, so select that option. It will now detect the BPM and ask if you would like to set the sample rate to the detected BPM. Click no, but take note of what the BPM was to compare it to the instrumental BPM. Now you must do the same thing for the instrumental track. Whatever that BPM comes out to is what you must make the BPM of the acapella. To change the speed of the acapella you can download a free audio sampling program called Audacity here: http://audacity.sourceforge.net/

After you have matched the BMP of both tracks you can now being to mash them up.


Now you must match up the tracks so they blend. You can use the metronome to help you get your timing right.

Here is the video of the mashed-up song I mentioned earlier in the post.

VST: Z3ta+


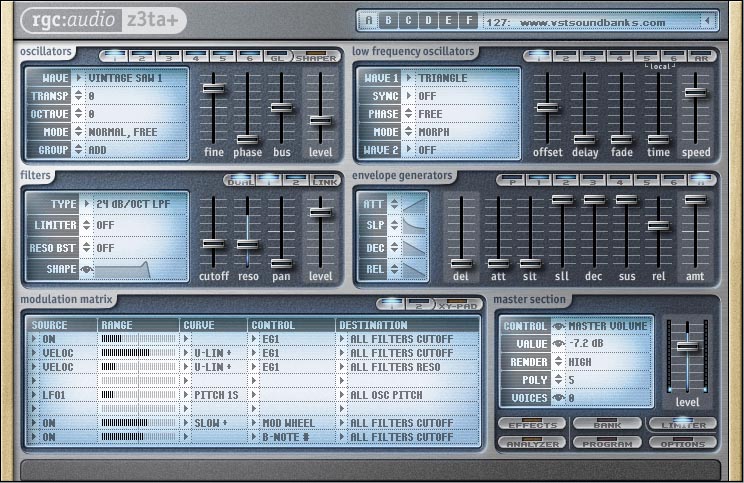
Z3ta+, by RGX Audio, is an overall good synth vst. It comes with hundreds of presets that are somewhat unique, but does not have the sound quality that most professional VST’s have. The presets contain mostly club and dance style sounds, but most sound versatile enough to use with hip-hop music. It has 6 oscilators, 6 lfo’s, arpeggiators, and two filters, which give endless options users who like programing their own sounds. The CPU usage is minimal on some sounds, and extensive on others, but it has yet to ever crash on me. The interface is somewhat small which makes it hardly ever get in the way while sequencing, but at the same time makes the options cluttered and the graphics quite boring. It does come with a PDF file explaining all of its features and how they work, which can be helpful to some users. There are also tutorials online that give specific help. It costs about 150 dollars, which is very reasonable because most professional VST’s cost over 500 dollars. Overall, I would highly recommend Z3ta+ to anyone who is seeking to find a good VST without spending thousands of dollars.

FL Studio: Automation

In this blog I will be following up on the “How to Add Effects,” blog that I did several posts prior. I will be showing how to use automation on an effect. Automation is basically a way to automatically bring an effect into a song. For example, say I wanted to slowly increase the volume of a snare roll during the song, I would use balance automation.

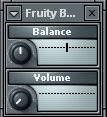
The first thing to do is open up the mixer to add a new effect. To view the mixer press F9. Now that your mixer is open, add a new effect as in the master channel as I showed in the prior blog. Add the effect “Fruity Balance,” and turn the volume all the way down. Your effect channel should look like this:


Now, go back to the mixer, right click the volume knob on your effect insert and click, “Create Automation Clip.” Follow the picture.


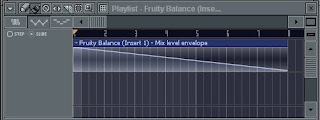
That will create a new automation channel in the mixer as well as an automation envelope in the playlist. The automation envelope will enable you to set how quickly and in what way your automation will come in. We will just make it come in gradually on a diagonal slope. It should look like this:


That’s it. Now play your song, or pattern the length of the automation envelope and you can hear the volume gradually increase.

Monday, April 20, 2009

Auto-Tune


Auto-Tune, commonly known as the T-Pain effect, is a pitch correction audio processor that is revolutionizing the hip hop and R&B music industry. The most known for using Auto-Tune is R&B artist T-Pain, along with others such as Lil' Wayne, Britney Spears, and the Rascal Flatts. Even country stars have confessed to using auto-Tune during live performances. Some include, Reba Mcentire, Faith Hill and Tim McGraw. I discussed briefly in my prior post how it actually works. Many artists use it by singing on and off key purposely, so that the computerized pitch correction can be heard, giving it a unique sound. The program itself can be used in most Digital Audio Workstations, or it can be used as a stand alone program. It costs about 400 dollars, which is pretty cheap for the millions of dollars that it is making musicians.

You can purchase it at www.antarestech.com

The effects to get the T-Pain effect are as follows:
Key-C
Scale-Major
Retune-0
Tracking-75
Rate-0.1
Variation-0
Onset
Delay-0
Onset
Rate-0
Pitch-0
Amplitude-30
Formant-100

This is a demonstration that i made using Autuo-Tune. Enjoy.

Tuesday, March 31, 2009

Lil' Wayne - Prom Queen Dance Remix

Hip hop artist Lil' Wayne has recently announced that he will be releasing a rock album called "rebirth" on April 7th. He will be composing his own guitar riffs for all his songs. He recently relesased his first single off the album called "Prom Queen." The single is already being highly criticized for its excessive use of auto tune. Auto tune is a device that alters your voice if you are singing off key to an on key pitch. So basically people who cant hit and hold certain notes use this device to help them. Many hip hop artists use it by purpously singing off and on key so you can hear the computer alter the voice giving it a robot like sound. Many of his fans support him and see it as a very coragous and creative idea while others see it as an autotune disaster. It seems as Lil' Wayne is trying to take his music to a new genre and audience, which could possible be one of his best decisions yet.

I remixed Prom Queen into a dance song. It actually sounds really good and people are saying it is better than the origional. What do you think? Here is the video.


Here is the origional song and video:

Tuesday, March 10, 2009

How to start making a beat

I was reading a War Beats blog and they were discussing how one should go about starting a beat. They go about saying how there is really no perfect answer to that question, which I agree with completely.

"War Beats" then says, "See if you really wanted, you could make beats all day every day. They would all sound bad, but they would classify as a beat." This is not true at all. You should make beats all day every day if you want to progess and become as familiar as possible with whatever program you're using. Of course when you first start making beats you personally will think they are great, even if they are horrible. After some time passes and you progress your skill, you can look back at your early work and see how much better you have become.


They Also say,"One thing I learned a while back is that the inspiration is the hard part, making the beat is easy after that." To me, inspiration is the easy part. Every one who makes beats was inspired by some sort of music or artist to being producing music. If you hear a song and are inspired to have that type of vibe in your beat, that is the easy part. The hard part is how to go about making it sound good.


http://fruity-loops.blogspot.com/search?updated-min=2008-01-01T00%3A00%3A00-08%3A00&updated-max=2009-01-01T00%3A00%3A00-08%3A00&max-results=4

Monday, March 9, 2009

DJ Khaled - Out Here Grindin' FL Studio Remake Video

This is a tutorial video I made to the DJ Khaled - Out Here Grindin' FL Studio Remake that is posted on my youtube. I fixed this version up a little from my origional one and made it sound almost exactly like the real song. I made this completely from scratch.

Sunday, March 1, 2009

FL Studio: Adding Effects

In this tutorial, I'm going to show how to add effects to your sounds. Some of these effects include: delay, reeverb, compression and all sorts of filters. All these simple effects can add a huge amount to your music. Starting out with the basic effects I listed really helps you get the hang of it and will prepare you for some of the more advanced effects that FL Studio offers.


To begin adding effects, Find the mixer button. This will open up the mixer that controls all the effects that can be assigned to different channels. Use the picture below to locate the mixer button.


Once the mixer window is open click the first tab that says "channel 1." Next click one of the several down arrows on the right side of the mixer window. Next click "select," and pick any one of the many that are listed. I'm going to pick "Fruity Delay 2," for example. Your mixer window should now look like this:


Now go to any channel that you have open. Click on the tab to open the channel settings window. To link this channel to the mixer, set the "FX" setting in the top right corner to "1."


Now the sound is linked to the mixer and the effect is ready to be used.

Sunday, February 22, 2009

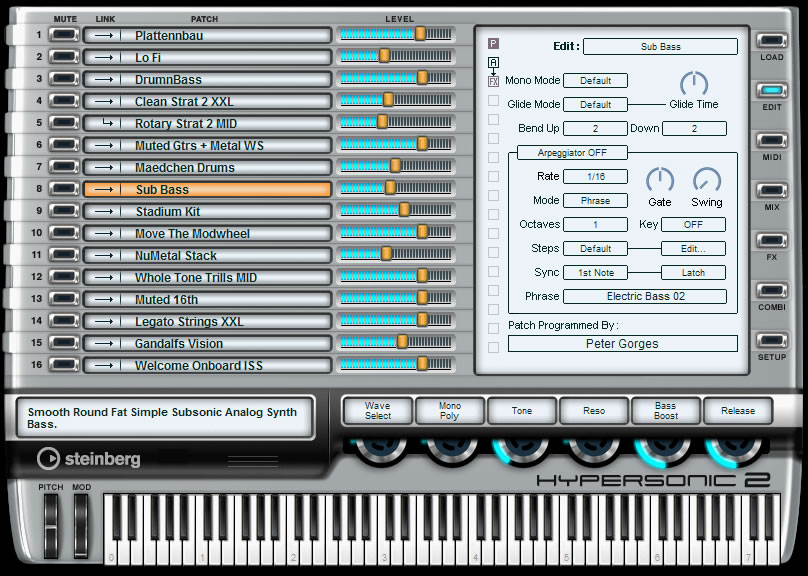
Jay-Z - Moment Of Clarity Remix & Hypersonic 2


I've been working on this new remix for about 4 days now and I finally finished it today. The song is called "Moment Of Clarity," by Jay-Z. The song is off Jay-Z's last album, "The Black Album." I used FL Studio ReWired with Reason 4.0, just as I showed you in my last post. The VSTI's that I used were Nexus and Hypersonic 2 in FL Studio for my synths, and SubTractor in Reason for my bass. I actually just got Hypersonic 2 VSTI, and I would recommend it to anyone looking for ultra high quality sounds. Its made by Steinberg, also the makers of Cubase. It has a never ending amount of sounds in its library. I'm pretty sure it has almost 2 gigabytes of sounds. It is a little bit expensive, costing about 400 dollars, but it is definitely worth it.

Friday, February 20, 2009

How To: ReWire Reason 4.0 To FL Studio

In this tutorial I am going to show you how to rewire Reason 4.0 to FL Studio. It may seem like a long, complicated process but its actually very simple. Rewiring bascially means that you will be using FL Studio as the main sequencer while using Reason 4.0 sounds and synthesizers. Many people rewire because Reason has better quality sounds than FL Studio, but FL Studio is a much easier program to sequence your song patterns with.

Once you have a new project open in FL Studio, create a ReWire channel by going to (Channels> Add One > Rewired. A channel window should now open. Find where it says client and click the drop down window to reveal Reason as one of the choices. It should look like the picture below.


When you have selected Reason as your ReWire client, click "show panel." This should make Reason should open automatically.

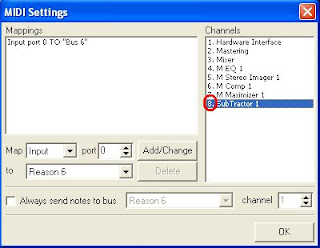
Once Reason is open, create a new instrument. Im going to use the SubTractor Analog Synthesizer for example. From the drop down menu on the top, go to (Create > SubTractor Analog Synthesizer). Now go back to FL Studio and click "MIDI Options" on the ReWire channel window. A MIDI Settings window will appear.

Now we are going to add the Reason instrument to FL Stuido. Find "SubTractor 1" in the channels section and highlight it. Next click the add/change button to map it into FL STudio, as shown below.


After that is done, add a "MIDI Out" channel. Do this by going to (Channels > Add one > MIDI Out) Now all that is left to do is to set the channel to 8, as shown below.


It is important to realize that the MIDI Out channel corresponds to the MIDI Settings channel. I used a red circle to show what I mean above.
Now your finished and your MIDI Out channel is set the the Reason instrument.


Friday, February 13, 2009

Mrs. Officer Remix Preview

This is a preview of a remix that I started about 3 days ago. The vocals are from the song Mrs. Officer by Lil' Wayne off his newest CD, "Tha Carter III." It's taking a long time to finish because I recently started using a new producing program called Reason 4.0. It's alot more complicated than FL Studio and I'm still trying to get the hang of it. I'm expecting the remix to be done in a few days. Feel free to check out my Youtube to hear the finished song. The link is on the bottom of the page.

Here is a clip of the real song to compare it to in case you never heard it.
www.youtube.com/djjmoney1870

Thursday, February 12, 2009

Adding vocals in FL Studio

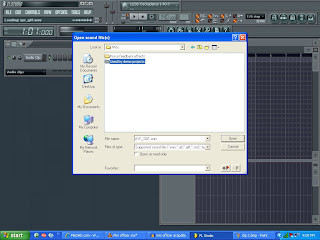
Im going to show you how to add vocals to your FL Studio project. First your going to have to add an audio clip tab. To do this you must first click channels tab on the top left, add one, and audio clip. Follow the picture below.


A floder called "patches" will come up in a file open window. Next click "misc" and then the "used by demo projects" folder.


There are many vocal clips here that can be used in your project. You can open one of these files, or use any WAV or MP3 file you may have on your computer.
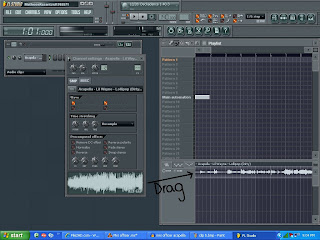
Once you have opened the file, you have to drag it into the playlist as shown below. Now you have added vocals to your project, and the only thing left to do is to sync it with your beat.


Monday, February 2, 2009

REFX Nexus


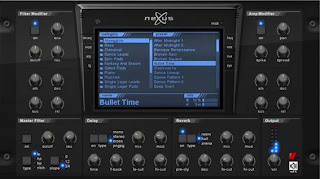
REFX Nexus has to be one of my favorite VSTI's. You can download thousands of expansion packs with sounds and skins that you will never get sick of. It has several built in filters and modifiers including delay and reverb that are very useful when trying to create a specific sound. This VSTI is mostly used for techno and dance type music, but the sounds are extremely versatile and can work with almost any type of music. The sound quality is much better than any other VSTI that I have ever heard. There is also the option to export the sounds in “ultra high quality,” which sounds amazing. Many big name producers use Nexus, including Manuel Reuter, the producer for Cascada. Although Nexus is a great VSTI, it's not the most affordable. It can cost anywhere from 400 to 1000 dollars depending how many expansions and accessories you purchase. I would recommend nexus to anyone trying to take their music production to the next level.

Check out the website here:

http://refx.com/?lang=en&page=home/latest