Wednesday, April 29, 2009

FL Studio: How to Export A Song

When you’re close to finishing one of your creations in FL Studio, your going to realize that you need to figure out a way to export your song, to a certain format. This is how you do it.
First, make sure you are in song mode. Verify that the orange light next to the play list is on “song.” Use the picture for help.


Next, go to File>Export>MP3 File. This will bring up the save box. Find a place for your exported song to be stored and click save. The next thing to pop up is the export window with a bunch of confusing options. I will explain what they all mean.
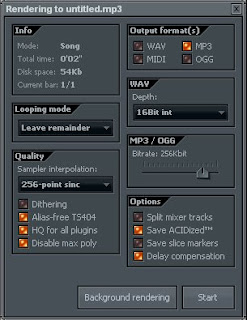

In the info box you have what mode your in (should say song), total time that your song is, the disk space it takes up, and the amount of bars in the song. Basically, you are going to want to leave everything the way it is, except for the output format, quality and the bitrate. The output format depends on however you would like your song. If you want the song for your Ipod, then leave it in MP3 format. If you want the song in a format that saves all your notes, select MIDI. Next the quality should be set at 256- point sinc, and your bitrate should match it. These numbers show the quality the mp3 will be exported. 256 is basically CD quality, so that would be a good choice. Finally, press start and wait for your song to finish exporting.

FL Studio: Recording Through A Microphone

If you want to take your music to the next level, you’re going to have to start recording your own vocal tracks. This is an essential part of making your songs unique and memorable. The first thing you are going to need is a microphone of some sort. You can use the one built into your laptop or computer if it has one, a cheap 5 dollar microphone from radio shack, or a high quality microphone from your local music shop. It’s up to you.
After you have your microphone hooked up to your computer, you will need to click to microphone button located under the playlist.

Most Likely it will tell you that your driver does not support audio recording, and that you need ASIO drivers. Don’t worry because all you have to do is download them from this site: http://www.asio4all.com/
Once you have your drivers installed you will have to change your audio settings accordingly. To do this go to Options>Audio Settings. You will now need to click the down arrow on the input/output section and change your sound driver to ASIO4ALL V2. Now your settings will allow you to record audio through a microphone. All that is left to do is click the same microphone button from the beginning and it will begin to record your voice.

VST: Trilogy


If you’re looking to add quality bass to your songs I would definitely recommend using Spectrasonic's Trilogy Bass module. The library has 3 different types of bass: Acoustic Bass, Electric Bass, and Synth Bass. The Acoustic Bass has mostly guitar and upright bass sounds. It can be used for any type of music. Electric Bass is mostly used for hip hop and R&B type songs, and Synth Bass is generally used for dance or techno type music. The VST package comes with 5 CD Rom disks that include 3 GB of sounds and samples. The interface is pretty simple looking. It is the same as Spectrasonics other VST, Atmosphere. They probably could have tried to change the design a little bit. It runs of very minimal CPU usage. It uses about 5% which is barley noticeable. I have tested the bass on high quality subwoofers and it sounds phenomenal. This VST is a must if you are trying to create hip-hop style music. It is a bit on the expensive side, costing about 300 dollars. If you have the money to spare I would definitely recommend buying this great VST.

FL Studio: How to Import A VST

I have reviewed a few different VST's and I realized that I never explained exactly how to use them in FL Studio. There really is not much to it, but it could be confusing to those who are trying to do it for the first time.

First, if you’re new to FL Studio, you will probably want to download some free-ware VST’s to get you started before you start purchasing them. A good site to go to is http://www.vstplanet.com/. They have hundreds of VST’s free of charge.Some of the VST’s that you download will install everything for you and you will only have to browse them in FL Studio. But for those that don’t, you will need to do something first.

Save the file wherever is convenient for you, but be sure to remember where you saved it because you will need to access the folder after it completes. When your download has completed, you will need to located the dll. File in the VST folder. It looks like this:


Copy that file and paste it into C:\Program Files\VstPlugins. If that folder sounds unfamiliar to you, don’t worry, it was automatically created when you installed FL Studio. Once you have pasted it in that folder go back to FL Studio. Next, click Channel< Add One < More. This will bring up a list of all your VST's. It will look like this:


Now, click refresh and it should say one new plug-in has been found. Scroll down to that plug-in which is highlighted in red and check it off. Now you are all set to use your new VST.

Monday, April 27, 2009

VST: REFX Claw


REFX’s Claw is VST that is used more for leads rather than basses. It has only 1 oscillator which doesn’t give much room for a good sounding bass. It has a very small interface with about 10 knobs that include: delay, cutoff, wave, drive and a few others. The small interface is good due to the face that it never gets in the way while sequencing. As for the colors, and design, well, its pretty boring to say the least. Despite its small size, lack of oscillators and knobs, it gives off a pretty decent sound. Another downside of this VST is the minimal amount of presets that are given. There is about 20 different presets that contain average sounds. Its CPU usage high for a 1 oscillator synth, which is not good for users who are using more powerful VST’s simultaneously. It uses about 3-4% CPU and has yet to ever crash my system. I would personally recommend this VST to everyone mainly because of the fact that it is free. It is definitely one of the best free-ware VST’s that I have used.

FL Studio: How to Add More Thump to Your Kick Drums


Have you ever used a sampled kick drum that has the sound you’re looking for, but not enough thump? Well I have the perfect solution for you that is extremely simple to do.

The first thing you have to do is open up your desired kick into a new audio channel. Next, go into your channel settings and turn the trim knob at the bottom all the way to the right. This will get rid of any unused sound frequencies that were left in the clip when it was sampled.


Now we will add an effect to the kick. Open up the mixer by pressing F9. Now you must add the effect called, “Fruity Parametric EQ 2,” into the first insert on your mixer. Now link your kick drum channel to the effect by changing the effect number in the top right hand corner of your channel settings to 1. Now that your channel is linked to the parametric EQ effect, we can begin shaping the kick. First, move the ball with the number 2 inside it up to about 140hz. This will add some bass to your kick. Next move the ball with the number 1 inside it up to 148hz. This will add the low end bass that most sampled kicks lack. You should now notice that your kick has a much louder thump to it.


FL Studio: How To Sample

In this tutorial I will show how to go about sampling. Sampling basically means using a piece of another song in your song. There are many unique ways go about doing it, weather it be chopping up the sample itself, or using it how it is.

First, you must find a song that you would like to sample, and then figure out what part of the songyou would like to use. The song I chose was, “Stairway to Heaven,” by Led Zeppelin. I chose to sample the introduction, or basically the guitar riffs before the vocals come in.

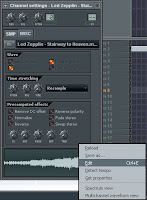
Now that you have your song and part chosen, you must load it into an audio clip. Click on your audio clip in the step sequencer to bring up the channel that will show the sound waves. Right click the sound waves and then click edit.


This will bring up the Edison Audio Editor. From here you must highlight the part you want to sample. Next press Ctr+C to copy it, then click tools > Save Audio Clip to Browser.


Now that your sampled clip is saved, you must now open the FPC. To do this go to Channels > Add One > FPC.


Now go to the browser that opened and drag your audio clip to one of the pads. Now each time you click the pad, your audio clip will play. Now you can begin sampling into your song.


Here is my finished song sampling Stairway to Heaven with an acapella of Eminem - Cleanin' Out My Closet